DOME CONSTRUCTION PART 3 CONCLUSION, REFLECTION AND VIDEO (SUCCESS!!)

In conclusion for our dome construction, we believe that our method was researched well and that preparation reflected well in the construction phase. Our dome was stable and waterproof, with the only water in the dome coming from the down slope of the land and the water flowing over the dome coming back under the structure
HERE IS OUR VIDEO
edited by Dean Ciancio
IMPORTANT TIME STAMPS
4:20 - water test
2:50 - finish structure
3:40 - finished dome 

SUMMARY OF CONSTRUCTION

GOODS
-The researched method was followed fairly well, with only small deviations
-The finished structure was very stable 
-Completely waterproof (excluding the water draining back down the slope)
-Window was secured well and waterproof
-Cost effective
-Removal of the dome was considered and was easily carried out (simply cutting a few zip ties collapsed the dome)
-The dome could be easily rebuilt if needed

BADS
-The structure lost a small amount of stability in select areas due to the reasons outlines in part 1 of dome construction
-incorrect material was used for the covering of the dome ('shrink wrap' instead of 'heat shrink wrap')

DOME CONSTRUCTION PART 2 (SUCCESS!!)

After the structure had been fully completed, then came the process of wrapping it in heat shrink wrap. It was at this point when we realized, instead of being sold 'heat shrink wrap', we were instead sold regular 'shrink wrap' which does not have the shrinking capabilities of the heat shrink. However it was still an industrial product that was waterproof and when layered formed a tight seal around the entire structure.
The above photo shows what the finished dome looked like with the window inserted, but also is the best image to display the shrink wrap on the exterior. Also again you can see the twisting affect from the zip tie issue outlined in the previous post, however oddly enough, those twisting joints became the strongest and when pushed on the structure felt VERY solid and didn't move at all (this can be seen briefly in the video at the 4:05 time stamp of video in part 3)
Although the wrapping was not the product we intended to use, we applied it very much the same way we intended to. (with some minor changes here and there to cover gaps that we missed when covering the frame)
The above photo shows the finished window with an acrylic pane. It was constructed almost exactly how we intended to with the wrap acting as a flashing and silicon and a rubber seal waterproofing the joint.

DOME CONSTRUCTION PART 1 (SUCCESS!!)

With our method decided, we began construction of the dome.
during construction, we encountered some issues with our chosen method and some mistakes were made. however! largely our design worked very well and our chosen method was followed almost perfectly. Construction was also cheap and relatively easy. The most difficult part of construction turned out to be the cutting and drilling of the PVC pipe, it was not necessarily challenging, but it was indeed the most time consuming portion of the building process.

 
The above photo shows the beginning of our construction, with the first pentagon section and all its struts cut to length. We cut and finished one section first rather than all the pipes at once, just to ensure that our method was sound and we were not going to encounter any major issues. (the first pentagon section can be seen on the ground in the above photograph).
In this next photo of construction you can see that the method was working well, and the pieces were fitting together nicely. At this point of the build we were very proud of our construction method, as we could already see the structure beginning to bend and attempt to form a circle or dome shape. However it was at this point where we made a mistake that should have been avoided.
The above photograph is an example joint from deans research. Note how the zips go through holes in the small pipe, and also holes in the larger center pipe. Unfortunately, our drill proved too difficult to drill though the thicker center pipe, but fortunately the zip ties fit perfectly around the larger center pipe meaning we did not have to drill the hole in the pipe. 

Feeling blessed, we moved on with construction.
The above photo shows the structure of the dome almost complete. The edges of the dome had to be pulled out so the dome reached its intended radius of 1 meter . At this point we discovered how spacious our design was, and we were very surprised. At this point you can also see the unfortunate affect or our zip tie drill error. The joints twist in a way they shouldn't, meaning the structure was weaker in some areas, however the overall design was not affected too heavily by this mistake.

FINAL DECIDED METHOD

For the construction of the dome, after investigating further into our researched construction methods, we decided to use the PVC pipe method, as it would be the most cost effective and is relatively easy to construct. The construction method will be as dean outlined in his first post on the PVC pipe method and the window fixing will be by my explored method. Also, we will be using heat shrink wrap to seal the dome and waterproof it.

To briefly recap the construction:
-PVC pipe will be cut to the correct lengths for struts
-PVC pipe will be cut into small connector joints
-Holes will be drilled through the struts to prepare them to be connected with zip ties
-Zip ties will go through drilled holes to connect the pentagon sections of the dome
-After all struts are connected correctly, heat shrink wrap will be applied over the whole surface of the dome to make it water proof
-A portion of wrap will be cut where the window is intended to be placed
-Window pane will be slotted into the previously cut strips and screwed into place
-Silicon and a rubber strip will be used to seal the joins of the window
-More heat shrink will be screwed in place with the window and shrink to provide flashing.

Geodesic Dome – Timber

To construct the timber frame geodesic dome we would need to prepare 26 laminated timber blocks for nodes, as well as 65 struts so they can be machined to size and shape.Once all the separate elements have been constructed and machined, a similar construction method to a PVC and steel tubing dome, where using the 6 pentagonal blocks and the 30 short struts, construct a series of pentagons which are then joined using the 35 long struts and the 10 hexagonal blocks. The 10 four sided blocks are used to form the base of the dome.
For a window, once the dome is constructed, use a Router to create a recess for a plastic or glass pane to be inserted as a window, for example, with a plastic sheet, a flashing is added around the window to draw water to the exterior of the dome and the pane is then screwed and silicone is applied to secure and waterproof the window.


For construction a total of 130 hinges and 260 screws are need.

Steel Geodesic Dome Method


Steel frame construction seems relatively simple, comprising of only a few repeated steps and lots of pre-preparation, and may in the long run prove to be more strong and durable then the other methods.

The design works on carefully cutting small steel pipes to desired lengths, for us that would be 35 55cm pipes and 30 60cm pipes, in order to have enough to fully construct our desired dome. TO do this we will need an angle grinder and the necessary safety equipment in order to safely cut the pieces into the desired measurements.

The next stage is to flatten each side of the pipes, possibly about 2.5-3cm at each end, so that we will be able to connect them together properly and securely, to do this we could find and rent a press, however a hammer may suffice, although it may take a while to hammer down 115 pieces of steel pipe.

 The next stage is drilling to allow the connection of bolts, to which we could use a drill press to cut holes in the centre of each flattened end about 1cm down from the ends of the pipe. We must ensure that the hole is bigger than the bolt to allow for the pipes to curve slightly in order to form the dome shape, however not too big that the bolt may fall out or be insecure.
Lastly, we will need to use bolts in order to connect each piece of metal in the hexagonal formation that geodesic domes are constructed from, and secure with nuts to ensure that the bolt does not fall out


This process seems relatively simple, however my concern is that the cost of getting all the steel pipes and equipment to complete the task may be incredibly high, and the fact that the pre preparation of flattening and cutting each piece may take an immense amount of time. We will need to discuss this to determine whether this is the most suitable design to follow. 
 

geodesic dome research (window mounting)

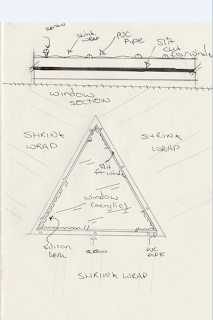
 For mounting the window in the PVC construction one method that i sketched and detailed was one where the PVC pipe would have a strip cut on the inner side of one of the triangle sections of the dome. The cut would be used to mount a material (most likely acrylic) in the slot. This cut can be seen in detail 01. The Window would then be secured in place with screws through the pipe which will hold the window in place. Further more, the entire dome would be sealed in a heat shrink wrap, which, when heated will shrink and fit to the form of the dome. The screws used to secure the window in place would also be used to secure the heat wrap in place for a starting point for the wrap to fold around the dome, eventually being screwed again on the opposite side of the window section of the dome. This can be seen in detail 02.
Also after the window and wrap are in place, a rubber seal and silicon would be used to further water proof the window joints.


DETAIL 01                                                                                                                           DETAIL 02

Geodesic dome research (window mounting)


with possible methods of construction researched, our primary focus has moved from the frame of the dome itself, to the specific complications that come with mounting a window into that established frame. one of the ideas we had, was to make one of the triangular sections of the dome out of timber, and keep the rest pvc. This was so we could have a conventional window construction, sill, etc. But there was going to be challenges to doing this. The connections were going to be difficult; transferring from a cylindrical form (with the pvc pipe) to the rectangular of the timber; whilst maintaining its structural integrity and ensuring it was still water tight. The extra weight could warp the dome and make it loose its intended shape. Etc.
Although the timber did make the construction of the window easier, and more ‘conventional’, it did complicate how it would mesh and work in conjunction with the rest of the pvc dome. And since there’s nothing really ‘conventional’ about a geodesic dome to begin with, we thought that the idea wasn’t particularly suiting or relevant to our design.


Geodesic dome research (window mounting)

After researching construction methods of the general form of the dome, we have moved on to researching a method for fitting the window into the dome in such a way that is water proof and reliable. For inserting a window into the dome there is a plethora of complications that come with our researched methods.

In using metal conduits, although the construction method seems relatively easy and straight forward, when it comes to inserting a window with a frame the structure is not very accommodating and also there is a cost issue. Using metal conduits the structure would cost roughly 50 dollars per group member. A similar problem arises with the researched PVC pipe method, with the structure not being very accommodating for the insertion of a window. However the cost of construction is considerably less. Although the PVC pipe is a lot more flexible when it comes to modification, with it being easily cut and bent to some degree.


In regard to insertion of a window the timber material is the most suited, with it being able to be cut to have a recess that a window can be inserted into and easily mounted in place. Even a frame can be created as highlighted by the linked video. Although timber construction would be time consuming and not necessarily cheap. If a method for inserting a window is not discovered for the other researched materials I think a combination of construction methods should be used in conjunction with the timber material. Though more research is required before a final method is chosen.

Geodesic Research (method and materials - PVC)

Geodesic domes have been around for many years, and there have been many different adaptations of the “dome” concept. But the most common construction technique has been the “2V” Dome. Perfect for a hot house or even a camping tent, the 2V dome displays the basics of triangular engineering principals and the simplicity of construction. The 2V dome can be made out of a wide array of different materials, varying in cost depending on their intended application. But one of the most common construction techniques is using pvc pip; as it is reasonably strong and very cheap and easy to use. To construct a 2V geodesic dome out of pvc pipe, the most complex components are the joining connections at every intersection. There have been many different attempts to make this system efficient. Such as people 3D printing their own custom pvc joiners, as to get the 5 star connectors. (which home depot or Bunnings wouldn’t conventionally stock). But the most reliable and easy to use system which I have found is the “zip tie” method. 
(trademarked by: http://www.ziptiedomes.com/) - Australian Patent AU2013200553 was granted for our design on 28 August 2014 by the Australian Patent Office.)
This method of Geodesic dome construction is very efficient, as the zip ties add considerable strength to the dome; (but more importantly the joints, where the weak points would otherwise have inherently been). And more important it makes the geodesic dome very simple and easy to construct. Because all of the connections slot into each other, there is not hinges or carpentry required. All you need is literally a saw of some kind and a drill. The 2V dome is created using a series of hexagonal and pentagonal shapes which are joined together with additional triangles to make the structure whole and complete. A base triangle can be taken out of the lower ring to create an opening, without really hindering the structural integrity of the dome.


Geodesic Research (method and materials-timber)

A 2V Geodesic Dome can be constructed using many different materials and methods, from timber, a metallic form of tubing, pvc piping or even treated cardboard.  Recycled Timber can be a relatively cost effective and environmentally sustainable material for construction of Geodesic domes.  To construct a 2V Geodesic Dome using Timber is to make a series of hexagonal and pentagonal blocks out of a laminated timber (to increase strength and reduce the blocks likeliness to split).  These Blocks need to be made to have the same depth as the struts being attached to them, i.e. if the strut is 90mm x 40mm the hexagonal and pentagonal blocks need to have a depth of 90mm and each attachment face on the blocks are to be 90mm x 40mm.  Attach Hinges to the base of each block to attach to each strut.  Using Struts of two different sizes, start constructing the dome from the ground up, using longer struts at the base and a four sided block referenced in the notes connected between each strut. Continue building up by the attached hinges to base of each block to attach and swing the struts into place then a large screw can be drilled into the top to fix it permanently. Each strut has been made with a slight angle to help create a flawless joint to each block and to help create the form of the geodesic dome.   A covering can easily be attached as a rebate can be made in the struts for glass or ply-wood panelling to be added, the structure can then be made waterproof by appropriate flashing and sealing. 

The Dimensions for Each Strut are as follows:

-30 x Strut A (short strut): 550 mm long with an angle of 15.86 degrees at each end.
-35 x Strut B (long strut):620 mm long with an angle of 18 degrees at each end.
-10 x Hexagonal Blocks
-6 x Pentagonal Blocks
-10 x Four sided blocks for the base of the structure         

Geodesic Research (method and materials - steel)

Whilst researching construction methods of geodesic domes I discovered that the construction of geodesic domes are separated into varying classes, namely class 1V, 2V, 3V, 4V etc. A 1V geo dome is comprised of triangles using only 1 size strut, a 2V requires 2 sizes of strut and so on. A higher classification meaning the structure will appear more spherical and will be more complex. Higher classed domes also offer higher stability.

For the sake of being able to complete the project we have decided to construct a 2V geodesic dome. Using an online calculator it has been calculated that 35 struts of 0.62 meters and 30 struts of 0.55 meters each are required to complete an entire dome with a radius of 1 meter, which totals at approx. 40 meters of construction material.

One possible construction method is connecting the struts in a series of ‘pods.’ connecting 5 short struts together at one node then connecting long struts around the perimeter creating a pentagon, repeating this process with the remaining struts to create a total of 6 pentagon pods which will be later joined to form the completed dome. While researching this construction method I discovered that steel EMT conduits could be used as the struts as their ends could be flattened so that connection of the nodes would be simple and easy. 

Geodesic Research

Developed in 1940 by American Architect Richard Buckminster "Bucky" Fuller in an attempt to solve the American housing crisis, Geodesic Domes are very strong and efficient structures.

Geodesic design incorporates large circles, in which are placed in the form of triangles within the surface sheer of struts, to which create a strong dome like structure. The purpose of Geodesic design is to create a dome made up of interlocking triangles, which are relatively strong and stable shapes, in order for the weight of the structure to be distributed evenly throughout the whole dome, creating a very stable and strong structure, whilst also being very lightweight and cost effective structure, due to rather low material requirements.
Geodesic design is typically constructed in sphere or dome shapes, as shapes that lack corners allow for a more even distribution of stress. Also, being a dome or sphere in shape, geodesic construction is also very aerodynamic, therefore it loses little heat to wind movements. Even though Dome construction is most effective, there is however no current facts suggesting that geodesic design cannot be effectively extended to any shape of construction.

Geodesic design has been used in a variety of different ways within residential and commercial design, however its primary use is construction of industrial buildings and stadiums. An example of a geodesic dome as Aami Stadium in Melbourne, Australia, as its weight bearing structure is effective for when the inside of the stadium needs to be somewhat "hollowed" out to allow for grandstands and the soccer oval.

Fuller used his geodesic design in order to create his Aluminium Dymaxion house, created in 1930, then redesigned in 1945. This creation was Fullers attempt to solve the American housing crisis by having pre fabricated structures that can be transported to a desired location, whilst also being durable, lightweight, and long term strength due to Fullers idea of interlocking triangles to form a dome shape. However sound the design was however, the idea failed due to the high cost to produce the Aluminium he required, meaning that the structures short-term setbacks clashed with Fullers long term aspiration.
Though there are many advantages through designing with geodesic construction, there are, however, some drawbacks to using this method of design. There is a large amount of unusable area within a dome because of the curved roofing. This means that, for example, in a 10metre dome, the open area of roof at the highest point of the dome cannot be reached and therefore is unusable, yet still must be heated in order for the place to be lovable.  The other downsides are that geodesic domes are hard to furnish, as there are no straight sides or corners.
Also some builders find it hard to make geodesic domes watertight, however this has been solved through using waxed cardboard triangles that overlap in order to allow water to flow off the dome.

TO DO LIST (check list)

Research (20%)
        
* Research Alternative wall construction precedents 
* Research materials and construction methods

-Technical (30%)

* Technical drawings that illustrate that the construction method is sound
* Sketches that illustrate flashing details.

-Construction (40%)

* The construction method follows the methodology as established by the research and technical component of the assignment 
* OHS has been considered during the construction of the wall
* Wall demolition and removal has been considered 
* Location of the wall has been considered in relation to the location of each group member

Remaining 10% is the presentation of the blog

* No broken links
* Blog produced over and extensive portion of the project duration
* The blog is clearly constructed, well written and referenced 
* All team members contribute equally
* The blog contains a reflective piece post-production revering the outcome of the task